This is our final script:


.jpg)


We each separated ourselves into a different department to help ease the flow of work. After we each all researched all the departments in post 10: http://ryanthrussell-a2-ms.blogspot.com/2010/11/post-10-job-roles-research.html We each decided on a role that we would be suited to in the group. I decided to take up the role of Lighting and Sound.
The pre-production jobs I have to complete for the role of Lighting and Sound are:
- Technical Reccee
- Lighting Plans
- Lighting Equipment
- Sound Equipment
I had to create the lighting plans of our filming location so I created a blue print of each location we are going to film in. I decided to do them from a birds eye view. Included in the blue prints I had to locate the main objects in the room like sofa's, tables, shelving etc. I also had to indicate on them the natural lighting and artificial lighting sources. So for natural I showed where all the main lighting sources come from. So I drew on where the windows are in each location. For artificial I located lamps, lights and spotlights.
For each blue print of each scene I also had to write a plan of whether we needed any extra lighting or effects. Such as an 85 filter to make our scenes and location look warmer or any blue gel to naturalise the filming environment.
Posted below are my Lighting plans:

In scene 2 we will be using 1/4 blue gel to put over the spotlights. We are using this to try and decrease the orange effect being created with the natural lighting coming through both windows when mixing artificial lighting with the spotlights. The 85 filter will be used to block out most of the natural lighting and allow the room to have a much clearer and warmer effect. We will also be using a full diffuser and pro light.

For scene 3 we will blue gel to put over the spotlights to get rid of the orange effect which will occur. We will also have a lamp on the desk to create a more office like atmosphere, the 85 will then be used to put over the camera to warm up the atmosphere.

For scene 4 we will be using 1/4 blue gels to put over the spotlights. We are using this to try and decrease the orange effect being created with the natural lighting coming through both windows then mixing the artificial lighting with the spotlights. We will also be using an 85 filter with the spotlights, which will be used to block out most of the natural lighting and allow the room to have a much clearer and warmer look. A diffuser and pro light will also be used during this scene.

In scene 5 we will also be using a 3/4 blue gel which will be placed over the spotlights. This will decrease the orange effect in which we don't want this to happen, an 85 filter will also be used to be placed over the camera, to block out most of the natural lighting and give a much warmer look to the atmosphere. Again, a full diffuser, and pro light will also be used.

In scene 6 we will also have a blue gel placed over the camera, which will tone down the orange effect caused by natural and artificial lighting. A desk lamp will also be used to create an office like feel to the scene. The 85 will then heat up the room and create a warmer tone to the scene.

For scene seven we will be using the same lighting with every other living room but with ½ blue gels over the spotlights.
.jpg)
For scene eight we will be using the same lighting with every other living room but with ½ blue gels over the spotlights.

For scene nine we will be using blue gel to put over the spotlights to get rid of the orange effect caused. We would also have the lamp on the desk on to create a more office like feel. We would then have the 85 to heat up the room.

For scene ten we will be using the same lighting with every other living room but with full blue gels over the spotlights.

For scene eleven we will be using blue gel to put over the spotlights to get rid of the orange effect caused. We would also have the lamp on the desk on to create a more office like feel. We would then have the 85 to heat up the room.

For scene twelve we will be using the same lighting with every other living room but with full blue gels over the spotlights.
As I will be using the sound equipment as well as planning all the lighting it is vital that I know how to work and set up the microphone to use during our filming. With this in mind me and two other members of the other two production groups in our class made a short video of how to connect and set up the sound equipment.
Our videos are posted below:
Nicola took up the role of being our set designer. We identified the pre-production jobs our set designer would have to complete. They are listed below:
- Researching
- Location Reccee (With camera man)
- Technical Reccee (With Lighting & Sound)
- Mise-en-Scene
- Mood Boards
- Props
- Make up
- Set Design
Costumes
Our set designers job was to create and design the costumes for our characters. She had to create 3 different styles. One for our 11 year old girl Isabel, the other for our women lawyer Lisa and the third for the male lawyer Simon.
These are the costumes that she created for our characters:
Isabel:

This is the costume design for Isabel. Nicola wanted Isabel's costume to reflect today's modern youth society but also something suitable for her age and can reflect the wealth of her parents as lawyers. Isabel will be wearing a short sleeve top, skirt & leggings with dolly shoes. This outfit will demonstrate the youth with leggings which many youth where nowadays. The dolly shoes will also represent Isabel's youth.
Simon:

This is the costume design for Simon. Simon is a hard working lawyer and is a dominant character throughout Synchronicity. As in the film Simon is just returning home from work he will be dressed in business dress. So he will be smart and in a suit and tie, with black smart shoes. Simon is also quite a stressed person so this will be reflected in his costume. His shirt top button will be undone and his tie will be loosened to show he is stressed and tired and in need of a rest.
Lisa:

This is the costume design for Lisa. Lisa like Simon is a well respected business woman. So Nicola wanted Lisa to be dressed smartly as if she has just had a day at the office. But also just like Simon, Lisa will be returning home after a long day at work in need of a rest. So therefore Lisa will be a suit of a jacket and smart skirt with a shirt. In some scenes it will show Lisa without her suit jacket on and her shirt un-tucked to show her looking tired and in need of a rest and relaxation.
Mood Boards
Another task for our set designer was to create mood boards for each of our characters costumes. Nicola started with creating a collage of suits of male and women lawyers to help for her costume design for Lisa and Simon. Nicola got a selection of different suits together so she could decided on the perfect suit for Simon and Lisa. In the end she went for a pin striped suit for Simon and a blazer and skirt for Lisa.
Here is the mood board for Simon & Lisa's Character costumes:


For Isabels mood board Nicola did a similar thing with gathering loads of images together of young girls fashion. Nicola saw a common trend in leggings and long top when ever she researched young fashion. With this in mind Nicola decided to go for this look with Isabel.
Isabels mood board can be seen below:

Character Profiles
Nicola also had to create character profiles for each of our characters and state what they look like and what there character personalities are like.
Isabels character is quite an isolated one. As she is ignored by her parents for most of the time who are to interested in there case and have no time for her. Isabel is always wanting to play but keeps getting pushed away by the parents. Which then forces her to become isolated and begging for attention.
Isabels character profile can be seen below:

Simon is a powerful character. His money and wealth and job as a lawyer allow him to be powerful. In the film his dominace and wealth show him off to be a negative character as he ignores Isabel and focuses more on his job.
Simons character profile can be seen below:

Lisa is similar to Simon as she is also a lawyer and her wealth allows her to become important. However she is more laid back than Simon. She can also be seen as negative as she also ignores Isabel.
Lisa's character profile can be seen below:

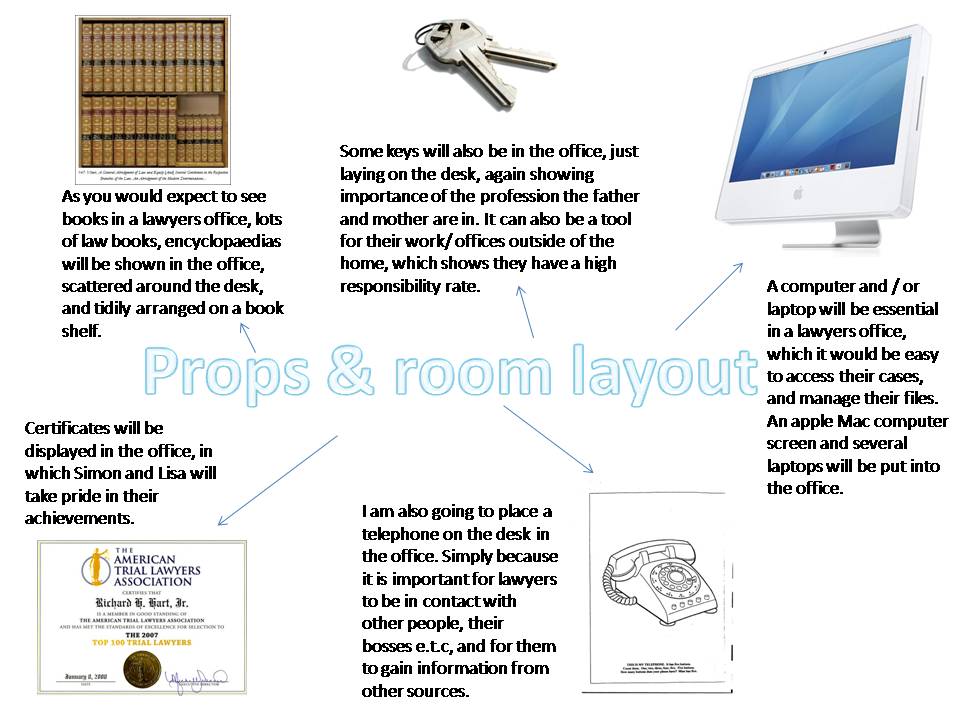
Nicola also had to think about how she wanted each of our filming locations to be presented. As we already had a living room to film in we feel we feel we didn't need to make any changes to it. As we didn't have an office we had to try and create an office from scratch. Nicola had to think about different props we could use to makke it look like an office.
The prop ideas for the office can be seen below:
Nicola and Tim who is our camera man together created our location reccee. Tim took photographs of each of our locations. The living room, shed, office and garden in a panoramic view. Anton our director who wrote the script for our short film added the notes for where power sources are, the permission and lighting.
Below are the groups location reccee's:


The Storyboards
Thee storyboards was a task that the whole production group played a part in. This is because it was one of the longest and difficult tasks to complete we felt that if we split it up we can ease the flow of work. We each then took up a few scenes each to draw up. This helped us complete them much quicker.
The Storyboards can be seen below:


The Shot List
Our director Anton had the job to produce a shot list. The shot list is a very important part to our pre-production documentation. It helps us correctly know what shots we have in our short film. It is cut down from the script.
The Shot list can be seen below:

