For this workshop we had to enhance the quality of lighting through the technical elements of lighting. We focused on more looking at "sources" and "colour".
We first looked at two different images from the film Forest Gump. Both Images show Forest Gump sitting on a bench in the same location but it is clear to see the quality of lighting is a lot different.
Below you can see the two images we looked at:
After we looked at the images the class had a discussion on what we thought of the two different images. This is what we came up with.
IMAGE 1:
From looking at images 1 it is clear to see that there is more natural lighting coming through. This creates a much clearer and realistic feel. This also creates soft lighting which brings all the colours out into the image. The natural light creates attached shadows on his blazer. You know that is is natural light because you can see the sun in the right hand side. Also the bench is placed underneath a tree so this creates the shaded shadows.
IMAGE 2:
If you compare image 2 to image 1 you will clearly see the quality of is a lot worse. This comes from the artificial lighting. It is a much more cooler feel to the image where as image 1 has a much more warmer look. You can see on the characters it looks a lot more bleached and theere is a lot of white being brought out to create the cold effect.
After we had looked at the images from Forest Gump we went on to discuss and look into 3 Point Lighting. 3 point lighting is used and developed in classic Hollywood film making. It is still used to this present day.
3 point lighting is a standard method used in film. By using three separate positions the photographer can illuminate the subject by controlling shadows and shading produced by the direction of lighting.
Key Light - Shines directly upon the subject.
Fill Light - Shines on the subject but from the side.
Back Light - Shines onto the subject from behind.
After we had looked at 3 point lighting we went on to look at how you can create an Atmosphere. We looked at two different images again like the Forest Gump ones to get an understanding of how to create different atmospheres both of corridors. We had a discussion and compared the sources of light. The Images can be seen below.
Different Atmosphere Images:
This is what we came up with after looking at the images:
IMAGE 1:
From looking at the first image you cant quite clearly see the corridor has been warmed up by other light sources to create the warmth effect. We discussed how there are extra lighting sources in the ceilings along the corridor to light up the whole corridor. Also there is lights directly below the actor to brighten him up. Also the end of the corridor is lit up by another additional light source.
IMAGE 2:
From image 2 you can see the corridor is only being lit up by one light source and these are coming from the artificial lights at the top of the ceiling. The lights are creating shadows rebounding into the floor. In turn this creates a quite cold dark eerie feel to the corridor.
We was then showed a chart of the Kelvin scale. This shows the different colour temperatures you should use in different situations.
We looked at how 85 filters are used in situations in the film industry. An 85 filter allows is a warming filter placed over the camera to create a warmer feel to the image. In some ways a 85 filter would be very useful in our short films if we was struggling to warm a location up with lighting.
Examples of where a 85 filer has been used:
Once we had established a good understanding of different lighting techniques we was set a task to go away in small groups and film a short clip putting everything we have learned into practise. We filmed a short clip of Liam standing up against a wall then walking down a corridor. We did this twice. The first time around we used an artificial light. This can be seen in Liam's face as it is creating a warmer effect on it. The second time around we jsut used natural light. You can see in Liam's face it is a lot more colder to when we used the artificial light.
Our practical work can be seen below:
Tuesday, 16 November 2010
Monday, 15 November 2010
Post 12: Advanced Production Research Workshop 2
We was asked to produce some practical work to help us understand the "quality" and "direction" of lighting. This would give us great understanding of quality of lighting an allow to have gained skills on it to take forward to use on our lighting plans for our short films.
We were mainly looking at the differences between Hard Lighting and Soft Lighting. The main differences between Hard Lighting and Soft Lighting is Hard Lighting creates sharp-edged shadows and Soft Lighting is softer in cotrast to the light and shade. It is indirect or difused which blurs contours and textures. Direction of lighting can come from many different angles including the front, side, back, under and on top.
This is an example of Hard Lighting. You can clearly see the sharp-edged shadows around the gentleman.
This is an example of Soft Lighting. You can clearly see more of he neck and there is a mix between light and dark across the man's face.
To help us get a better understanding of we looked at the music video Madonna - Vogue. This was a great example of showing the different lighting effects of quality and direction as well as hard and soft lighting. In groups we were handed screen shots of some parts of the video and in groups we had to talk about the effects of lighting.
Above is the three screen shots we were asked to talk about. We talked in groups about firstly whether we thought the lighting was hard lighting or soft lighting and what effects this gave with shadows, edges etc. We then went on to talk about where we thought the direction of the light was coming from and what the quality of light was like.
The rest of Madonna - Vogue can be seen by clicking this link:
MADONNA - VOGUE
"Quality" Practical Work
We was separated into two groups in class. We was set up to explore lighting "Quality" and the other group was set up to explore "Direction", both groups explored these in a practical workshop.
We was in a group of 5 so each one of us had to take a different role in the group. The roles we had allocate around in the group were:
- Director
- Camera
- Gaffer
- Clapper
- Recorder
- Actor in scene
I decided to take the role of the clapper. My job as the clapper was to write down on a white board what the audience are watching. So for example whether we are using a diffuser or blue gels.
Equipment & Set up - We was using all different kinds of equipment in this workshop from cameras to crock clips. Below I have listed the equipment we was using and had to set up:
- Camera
- Tripod
- Base Plate
- 1x Lowel Pro 250Watts Light
- Barn Doors
- Torch
- Batteries
- Laminated White Board
- Marker Pens
- Light Stand
- Crock Clips
- Diffusers
- Safety Gloves
- Props - Wine bottle, telephone, shot gun, stool, chair
We set up all our equipment in the school drama studio. Our recorder drew a birds eye view of how we set up all our equipment and props. This can be seen below:
Predictions - As a group we predicted that by doing this workshop we could aim to show the other group the differences between hard and soft lighting. We also predicted that using different diffusers we could see if this effects the quality of the light.
Factors To Change - The factors that we decided to change are as followed. We felt that we needed to change the direction of the light. So for example moving the light closer or further back to show different lighting effects and seeing if it causes different shadows. Also we were looking at moving the camera to see if this has any other effect.
Factors To Measure - The factors that we needed to measure were what different lighting effects had on the quality of shot. Also we had to measure the amount of lighting we wanted. This is to make sure we create the effects we wanted.
What Will Stay the Same? - The thing we wanted to stay the same was the angle and positioning of the light. This is because it could have drastic effects on trying to tell the differences between hard and soft lighting.
Below I have posted our video. We were trying to show the differences between hard and soft lighting.
Quality Lighting Video:
After watching this back though you like our group also feels is that is hard to get an understanding of the differences as the video is maybe not long enough. So therefore without sounding patronising it is to everyones interest to pause the video at certain points to see the differences in the lighting effects. In our group discussion after the workshop we highlighted the agenda of the error we made but we did not feel it effected us on the targets we wanted to achieve. We presented our less than marvellous video to the rest of our class using the quite fantastic pause button to pause at certain points to show and explain the different lighting effects.
Strengths & Weaknesses of Experiment -
Like I said one of the weaknesses in the group was our overall video that we finished up with. We felt we did not record for long enough to be able to show the differences in lighting without pausing to be able to see. However we felt that the different lighting effects we did was a success because when you did pause the video you could quite clearly see this. So this was on of our strengths. Another strength we felt we had was how well we all worked together as a group with setting up equipment, setter ling into our roles and overall working well as a team. This has given us great experience for when we go into our production groups to make our short films. One weakness we had was we filmed with the camera out of focus. This is because the camera was focusing more on the white board telling us what lighting we was using. Another weakness was we was unable to to create the blinds effect we wanted. We was unable to create the shadows across our actor that we wanted so that was disappointing.
How Will This Help Us? - Learning this will give us great experience when we go into our production groups. We have gained experience from learning the different types of lighting and will be bale to showcase these in our short films. Also working in groups and each having a role has been good because when we go into our production groups we will be able to settle into our roles easier.
"Direction" Practical Work:
The other group focused on the Direction of lighting. There job was to focus on how the different direction of lighting can change the way that characters are shown. There practical work can be seen below.
Direction Video:
The Video shows how changing the direction of lighting can effect the way characters or portrayed. For example at 2.19 you can clearly see a dark shadow across the actors face. This lighting effect will make the audience feel that he is quite a dark and mysterious character. But if you contrast this to the lighting effects at 5:49 you will see a clear change to how the actor looks. With the tin foil placed in front of the light and the different direction of lighting the atmosphere is a lot different and the way the lighting has changed it could make the audience feel that the character is quite interesting and the good guy.
Sunday, 14 November 2010
Post 11: Advanced Production Research Workshop 1
Creating a style for our short film would be effective and a style we have researched and looked into is lighting.
In class we looked at Film Noir. Film Noir is term used to describe stylish Hollywood crime dramas in the 1940's - 1950's. Film Noir is associated with low-key black and white visual style that has roots in German cinematography.
These images are examples of Film Noir:
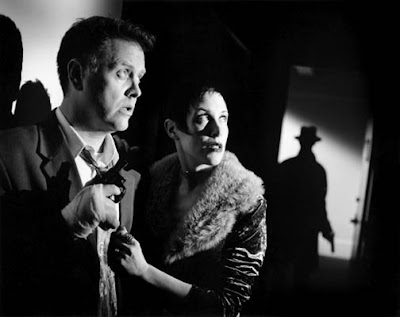
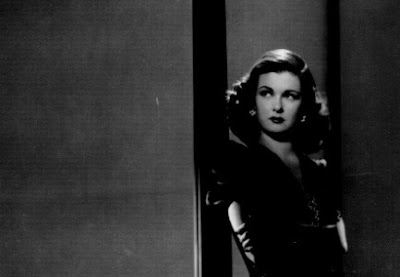
We can use lighting in our short films as a good way to emphasise shadows and highlights. We learned there are two different types of shadow attached and cast shadows.
We also learned that different lightning can affect textures and can dramatize any object. In class we did a practical and explored this technique. We completely blacked out the room then used a single light to bring up and show all the different textures on a shell.
This is the practical work that we done:
Post 10: Job Roles Research
To make sure we understand each of our roles when carrying out the production of our short film we researched job roles in the film making process.
We researched the following departments:
- Direction
- Camera
- Lighting
- Production Sound
- Art Department
This is what I found out about each of these areas.
Direction:
The main role in the direction department is the director. The director is responsible for the creative vision of the whole feature film. The director is supported by his assistant directors who ensure the directors targets are met. Other roles in the direction department include Script supervisor and the runner.
Camera:

In the camera department the head of the department is the Directors of photography who works closely with the production designer to help fulfil the directors vision for the film. Camera operators make sure the camera is moved carefully and to the DoP's , and are responsible for the rest of the camera crew. These positions are:
- 1st Assistant Camera - The role of the 1st assistant camera is to accurately judge and pull focus on every shot.
- 2nd Assistant Camera - Loads the film and provides general camera assistance and any trainees.
The camera department also work closely with the lighting department.
Lighting:
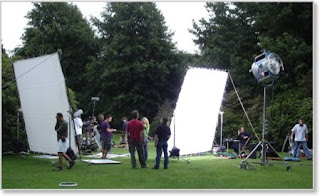
The lighting department plays a crucial role in most film roles. At the head of the lighting department is the director of photography and there role is to give the film its unique visual identity or look. The gaffer is in charge of all electrical equipment and leads a team of technicians who install the lighting equipment. The best boy deals with all the paper work and co-ordinates the teams of lighting technicians. The lighting technicians help to supply relevant power supply for a film.
Production Sound:
In the sound department the production sound mixers are responsible for the job of recording sound and dialogue and ensuring that dialogue recorded in the film is suitably clear. The Boom operator is responsible for placing the microphone in the right position without interfering with the camera or lighting crew. The sound trainee assistant is responsible for supplying back up to the sound mixers and the boom operator.
Art Department:
The arts department are led by the production designer. The production designer is responsible for the whole arts department. In the arts department team you have Art Director who acts as a project manager and works closely with the production to make sure there visual ambitions for the film are correctly met. The supervising Art Director manages the budget so that the Production Designer can set about there task and fulfilling it.
After we had researched and found out about job roles we had a production meeting. In the production meeting we devised a plan to who would take each role. As Anton had written the script it was a sensible option for him to be the director. I took up the role of the lighting department, Tim is the camera department and Nickie will be in charge of the Art department.
Post 9: Individual Script Feedback
We was set the task of creating our own scripts for our 5 minute short film.
This is my script called "One Chance":

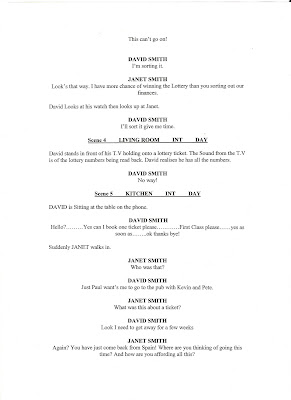
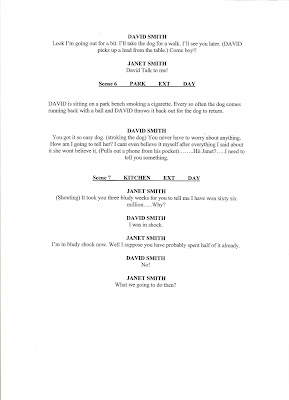
This is my script called "One Chance":


Only a few of the scripts creating by me and my other class peers would be selected. So in class we each read through each others and gave feedback on what we thought about each others scripts. We also had a script workshop with Becky Knapp who came in and helped us develop our scripts and gave her own personal opinions and feedback on what she thought about our scripts.
This is the feedback I received about "One Chance":

- People thought that the storyline was interesting but it lacked momentum
- With David winning the lottery. Why was he sad and not happy?
- Winning the lottery should bring happiness to a family and not break it.
- Surely David would of told his family straight away.
- It has a good message that money cant solve every problem. Which is shown through the breaking marriage and him not being able to come to terms with winning the lottery.
This was the feedback I received from my fellow Class Piers, my teacher Miss Shipp and Becky Knapp.
With this Feedback I received I decided to work on ways in which I could improve my script. I took into account the feedback and used it heavily.
To give my story more momentum I decided to add in extra scenes at the start of my script to show the problems between David and his wife to build the story up. Also I have decided that David tries to use them money as a way of saving there marriage but dew to the problems they are unable to get the marriage back on track. David eventually gives the money to charity.
Within the class only 3 scripts were selected. Unfortunately my script was not selected.
Tuesday, 2 November 2010
Post 3a: Target Progress
In June I set myself targets that I want to achieve and in this post I will be analysing them and seeing weather I have made significant progress towards achieving them.
1. The first target I set myself was to learn how to use the edit suite and understand everything about it. As we have not started editing yet I have not made any significant progress in achieving this target as of yet, but when we do start editing I will make sure I stick to the tasks I set myself of becoming more familiar with the edit suite.
2. The second target I set myself was to make sure I keep up to date with all my work and my blog. When I set myself this target back in June I thought that it would be good to help me keep motivated and keep up to date. Looking at this target I think it may be a good thing to review it as I feel I have not stuck to this and have often found myself having to play catch up in order to get all my work done to the deadline it was set.
3. The third target I wanted to achieve was too improve my overall understanding of key media terms and equipment. Ways in which I wanted to make sure I achieved this was to make sure I practise with media equipment and revise key terms. If i continue to do this as I am at the moment I should have no problem in achieving this target.
4. For my fourth target I set myself to task of making sure I have a well developed short film. Ways in which I wanted to achieve this was to make sure I have a well developed and clear script and make sure we get it a filmed and edited before the deadline.
5. My final target I wanted to achieve was to make sure I meet all deadlines with work. Looking back at setting myself this target now I think I need to re-think this target through as I have not been sticking to deadlines and finding myself considerably behind at times. Ways in which I can improve this is to make sure that I set myself little targets and deadlines to complete certain tasks and posts.
Subscribe to:
Comments (Atom)


